Image Maker Guide · Generate → Gallery → Compare → Presets
This guide explains how to use Image Maker through the workflow: Workspace → Gallery → Compare → Style Presets.
Last updated: 2026. 02. 20
Overview
Image Maker is more than simple image generation.
It provides a complete workflow—from creating to managing, comparing, and iterating on results.
Not a single click, but a repeatable creative loop.
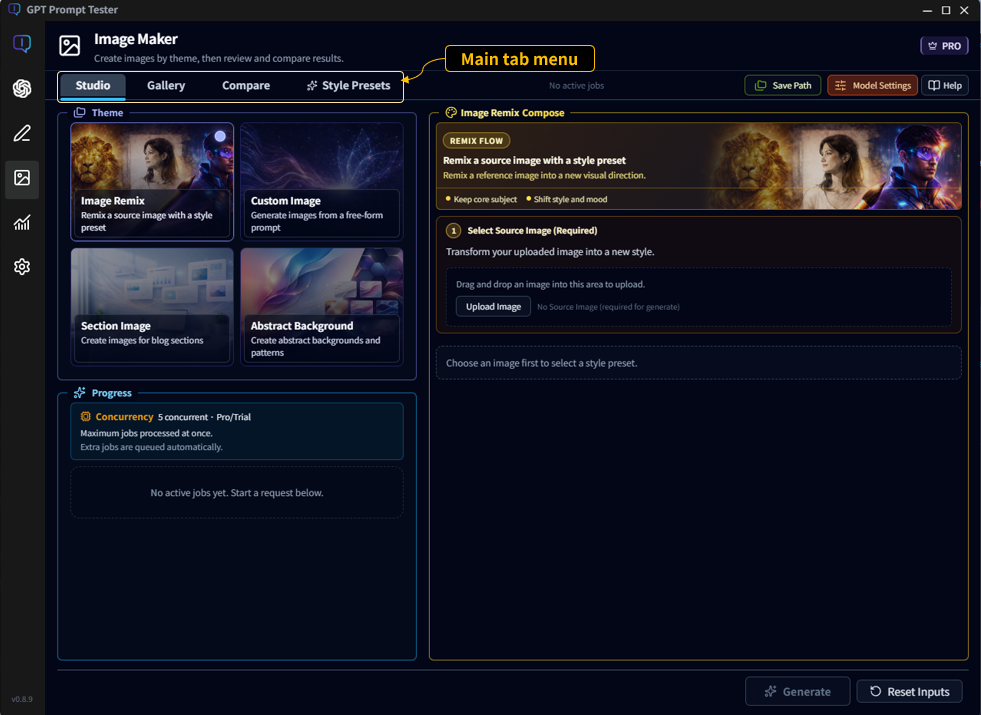
Image Maker is organized into main tabs in the top-left menu.
Once you learn it, you can quickly repeat the cycle: “Generate → Manage → Compare → Iterate.”
- Studio : choose a theme, fill inputs, request generation, and track progress
- Gallery : view successful results, rework, upload to WordPress, and manage records
- Compare : side-by-side comparison (slider) + compare inputs/settings differences
- Style Presets : browse/select presets for Image Remix and manage your custom presets
The tab layout may vary depending on the app version.
TIP) Use this flow: “Create in Workspace → pick in Gallery → confirm in Compare” to reduce trial-and-error.
Studio · Generate and manage image jobs
The Studio tab is the main workspace where image jobs are created and executed. Here you select an image theme, configure inputs, generate images, and monitor progress.
The typical workflow is: Select theme → configure inputs → generate → monitor progress.
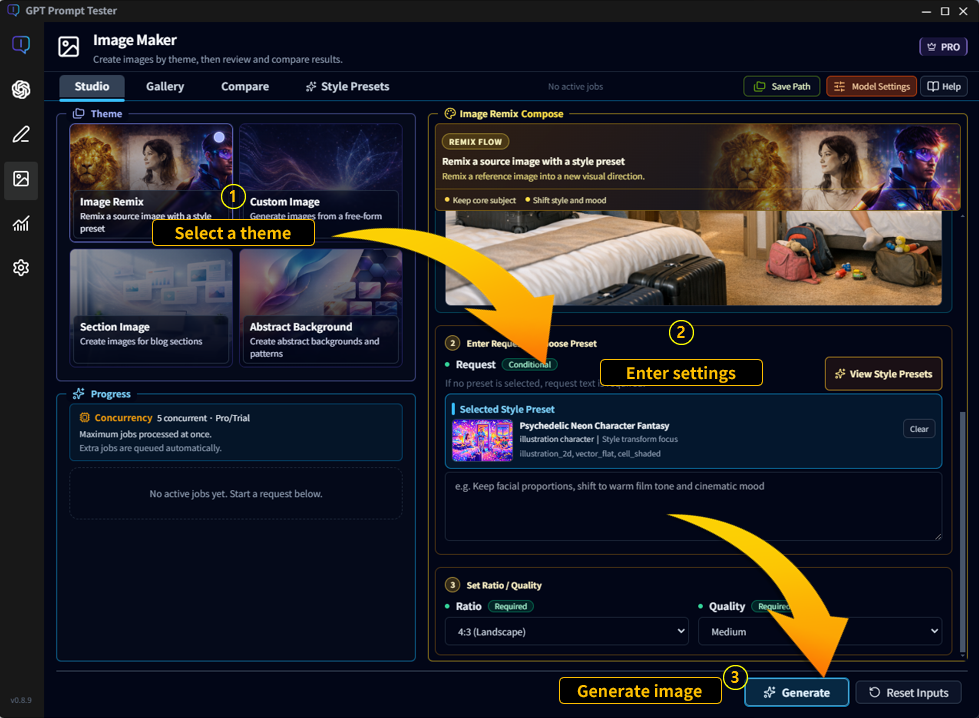
- Select a theme(①) : Choose the type of image you want to create.
- Enter request settings(②) : Provide prompts, presets, or other required inputs.
- Generate image(③) : Click [Generate] to start the job.
TIP) Different themes may require different inputs. If required values are missing, the generate button will remain disabled.
Monitor generation progress
After starting a job, Image Maker processes it asynchronously. You can monitor running tasks and queued jobs in the progress panel.

- Progress cards : Each generation request appears as a card in the progress panel.
- Running / queued jobs : Jobs may be queued if concurrency limits are reached.
- Stop button : Cancel a running job if needed.
- Active job indicators : Active job counts appear in the left menu and tab header.
- Unread results indicator : Newly generated images are counted in the Gallery tab badge.
Image save location
Generated images are stored locally on your computer. You can freely choose the folder where images will be saved.
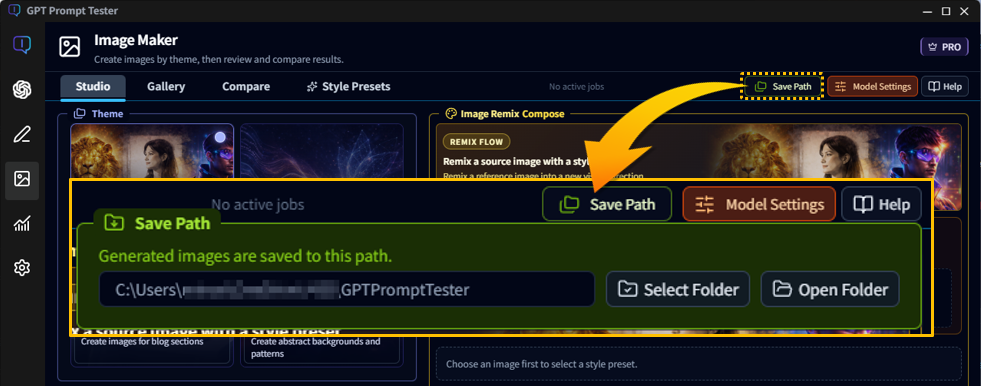
- Select folder: Choose a directory where generated images will be saved.
- Open folder: Quickly open the save directory in your file explorer.
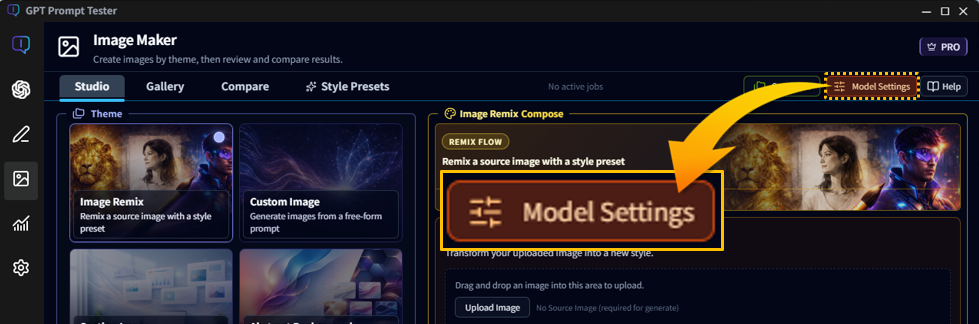
Image model and prompt settings
You can configure the AI model, image generation options, and prompt overrides used by Image Maker. Settings can be adjusted per theme and reused later.
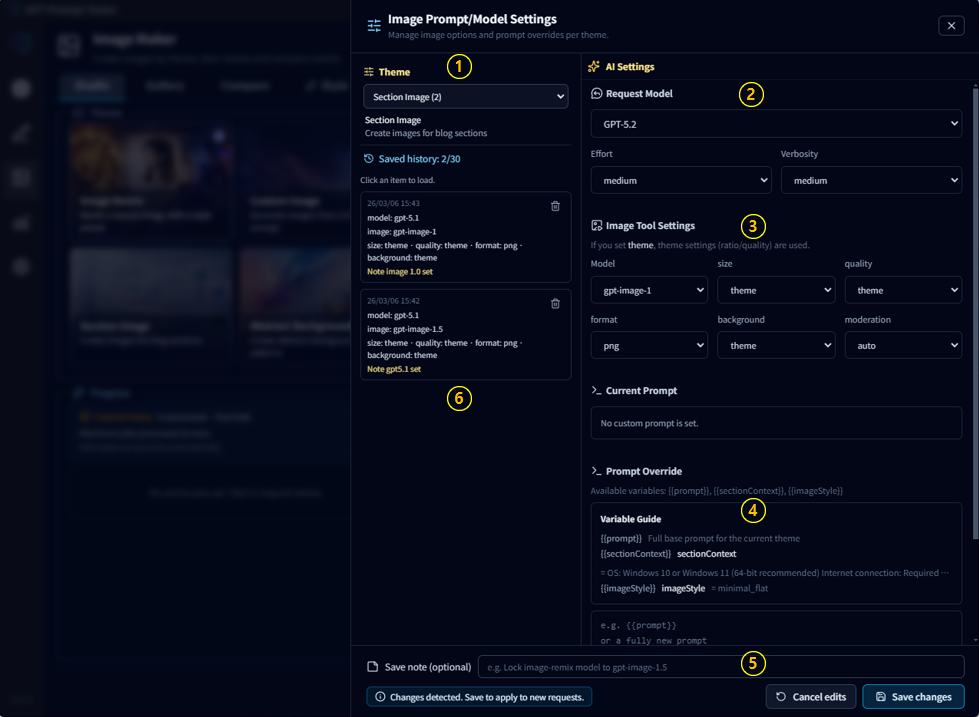
- ① Theme selection : Choose which image theme the settings will apply to. Each theme can have its own model, tool settings, and prompt configuration.
- ② AI settings : Select the request model and configure generation parameters such as effort and verbosity.
- ③ Image tool settings : Control image generation options including model, size, quality, format, background, and moderation behavior.
- ④ Prompt override :
Advanced users can override the default theme prompt or extend it
using variables such as
{prompt},{sectionContext}, and{imageStyle}. - ⑤ Save note : When saving settings, you can add a short note describing the configuration. This helps you remember why a particular model or prompt setup was used.
- ⑥ Saved history : Previously saved configurations appear in the history list. Click an item to quickly reload the same model, tool, and prompt settings.
TIP) Most users can rely on the default theme settings. Prompt overrides are intended for advanced workflows.
Studio limits PRO
Some Studio capabilities differ depending on your plan.
TIP) If the result limit is reached, you must delete older results before requesting new jobs.
Gallery · Manage Results
The Gallery tab is where all generated images are stored and managed. You can browse past results, inspect detailed generation information, reuse images for new jobs, or export/import result records.
The Gallery is divided into two main areas: the results list on the left and the result details viewer on the right.
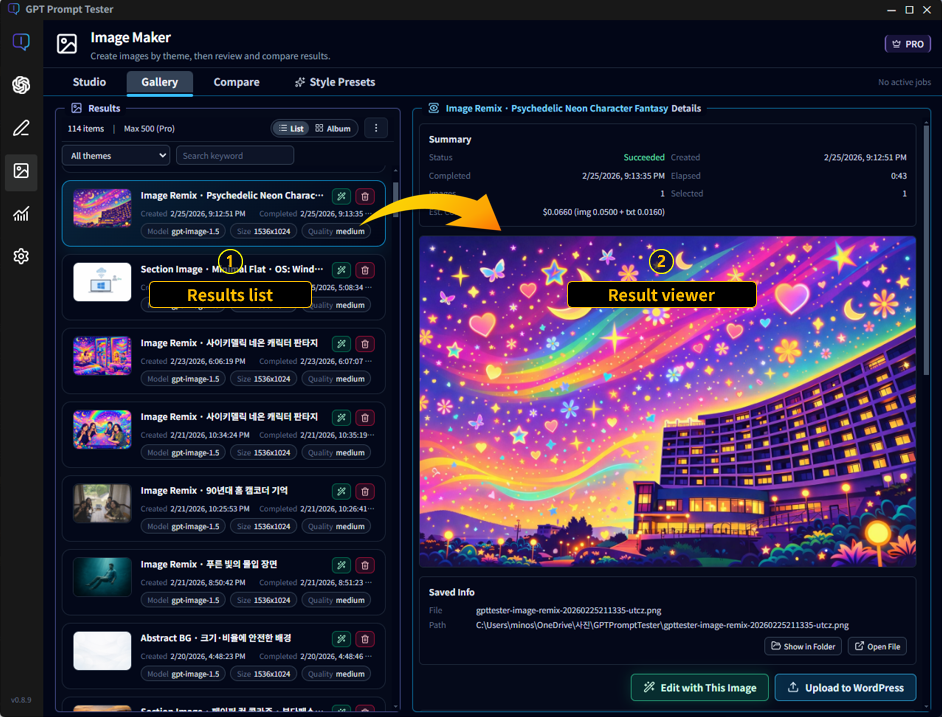
- Results list (①) : Displays all generated images.
- Detailed result viewer (②) : Shows the selected image and generation details.
Filter and manage results
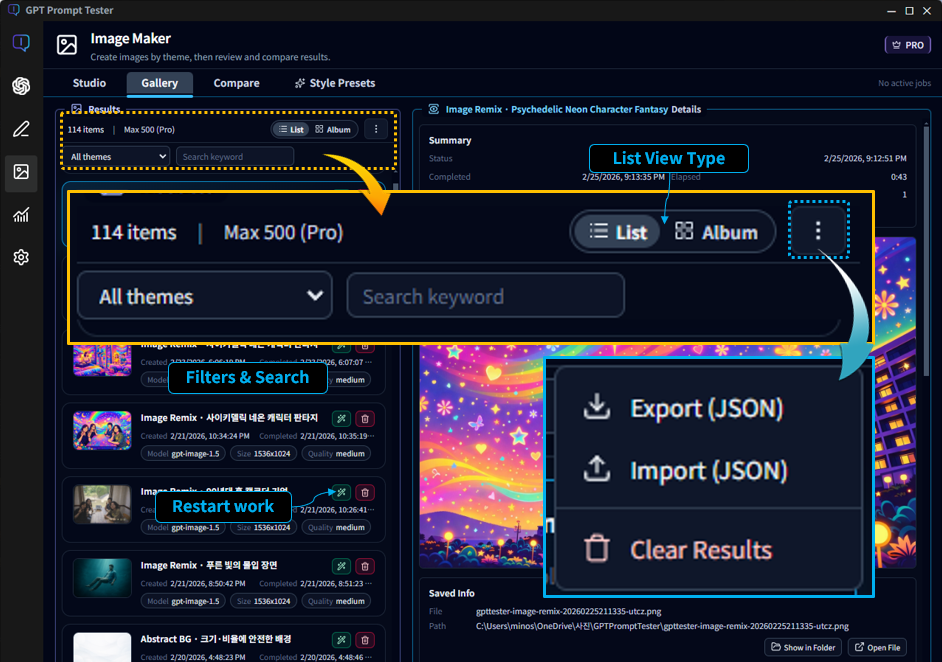
- Results counter : Shows the number of stored results and the maximum limit for your plan.
- Theme filter : Filter results by image theme.
- Keyword search : Quickly locate results using keywords.
- View type : Switch between List view and Album view.
- Restart work : Start a new job using the selected result as the base image.
-
PRO
Management menu :
Export, import, or clear result records.
Export (JSON), Import (JSON), and Clear Results are available in the Pro plan.
Inspect result details
When you select a result, detailed information about the generation process appears in the right panel.
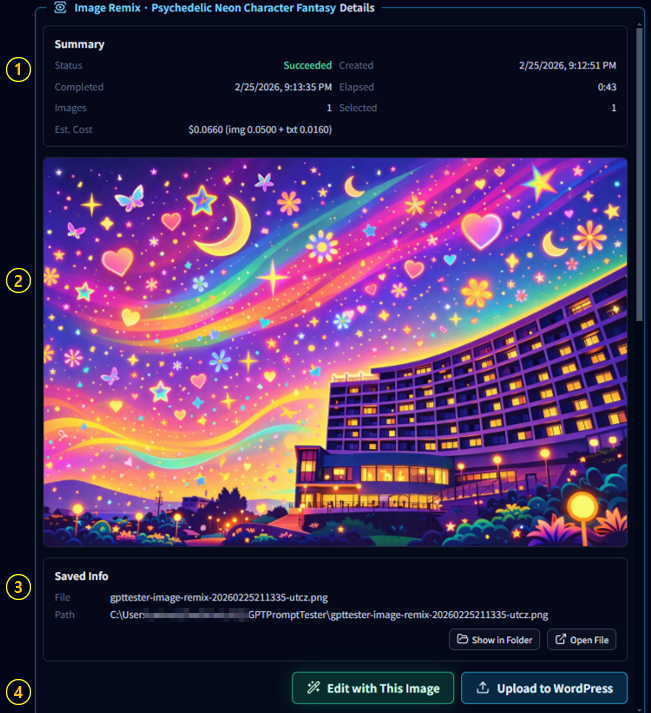
- Summary (①) : Displays generation status, creation time, elapsed time, and estimated cost.
- Preview image (②) : Shows the generated image so you can quickly inspect the result.
-
Saved info (③) :
Displays the generated image file name and the local save path.
You can access the file directly using the following buttons:- Show in Folder : Opens the folder where the image is saved.
- Open File : Opens the image file directly.
-
Action buttons (④) :
Continue working with the generated image.
- Edit with This Image : Starts a new job using the current image as the source. This is useful when continuing an Image Remix workflow.
-
Upload to WordPress :
Uploads the generated image directly to your WordPress site.
This feature is available when WordPress connection settings are configured in the app.
Review input and generation settings
The lower section of the details panel shows the inputs and configuration used when generating the image.
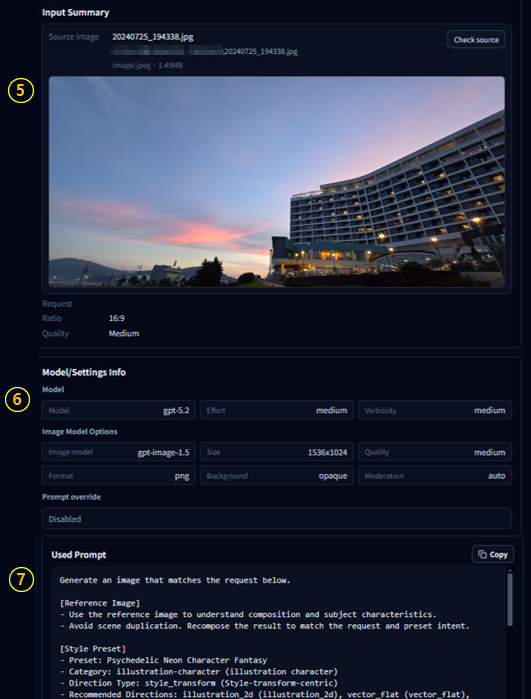
- Input summary (⑤) : Shows the source image and request parameters used during generation.
- Model/settings info (⑥) : Displays the AI model and image tool settings used for the job.
- Used prompt (⑦) : Shows the final prompt sent to the image model. This helps you understand how the image was generated and reproduce successful results.
TIP) Reusing successful results with Edit with This Image is one of the fastest ways to iterate on styles and prompts.
Compare · Compare Results
The Compare tab helps you evaluate two generated images side by side. You can compare visual differences with a slider and also inspect the prompt and model settings used for each result.
This is especially useful when you want to check how a remix result changed from the source image, or compare two similar outputs before choosing which one to keep or refine further.
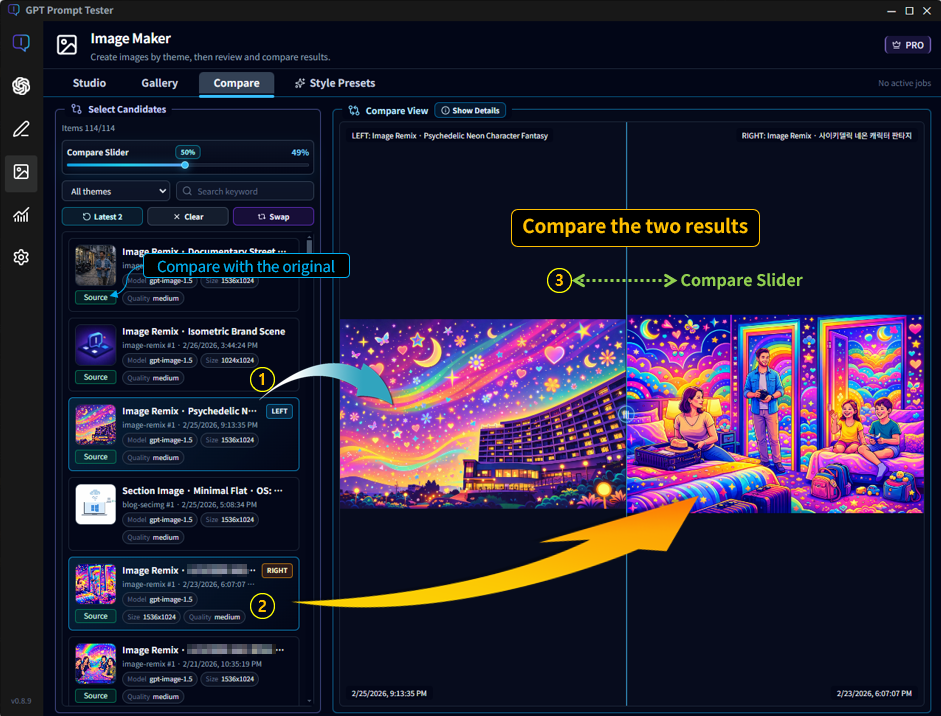
- Select candidates : Choose two results from the left list. One image is assigned to the LEFT side and the other to the RIGHT side.
- Compare with the original : If a result includes a source image relationship, you can use that as one side of the comparison to see how the generated image changed from the original.
- Compare slider (③) : Drag the slider to visually inspect differences between the two images. This makes it easier to compare composition, color, lighting, and subject changes.
- Filter and search : Use the theme filter and keyword search to quickly find results to compare.
- Swap / Clear : Swap the left and right images or clear the current comparison selection.
Compare metadata and settings
The Compare view can also display the generation details for both results. This helps you understand not only how the images look different, but also why they turned out differently.
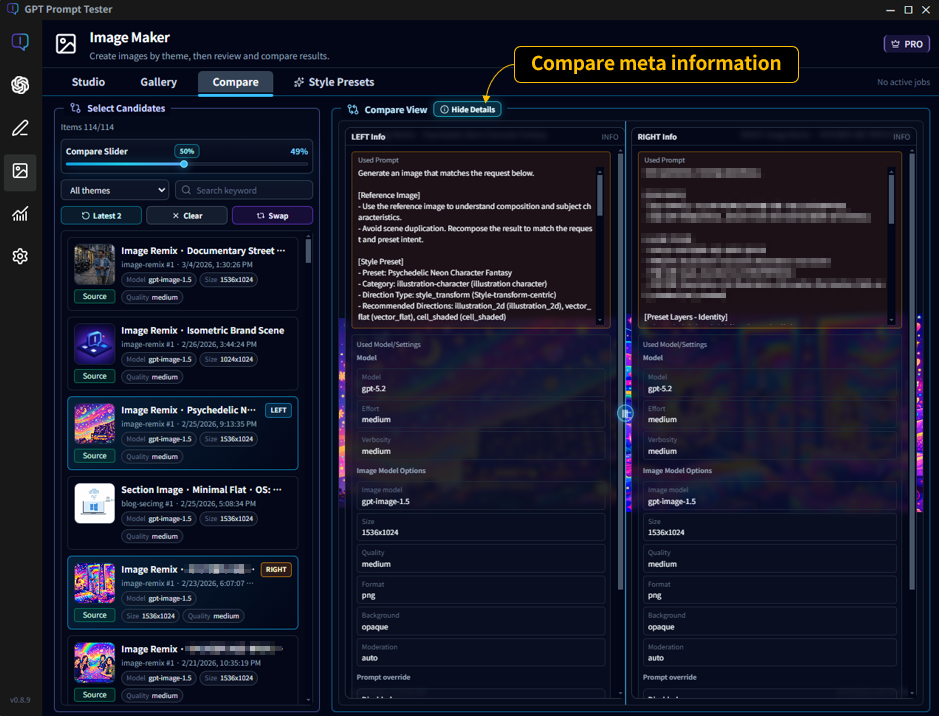
- Show details : Click [Show Details] to open the metadata comparison view.
- Used prompt : Compare the prompts used to generate the left and right images.
- Model/settings info : Review differences in model, effort, verbosity, image model options, size, quality, format, background, and moderation settings.
- Prompt override : If custom prompt overrides were used, they also appear in the detail view.
TIP) When two results look similar, checking the prompt and settings differences often reveals which parameter actually changed the output.
Style Presets · Remix Styles
Style Presets are predefined visual styles designed for the Image Remix theme. They help you quickly transform a source image into a new artistic direction without writing complex prompts.
Each preset defines a structured style configuration, including identity constraints, scene description, rendering style, and blocked elements. This allows you to consistently reproduce specific visual styles.
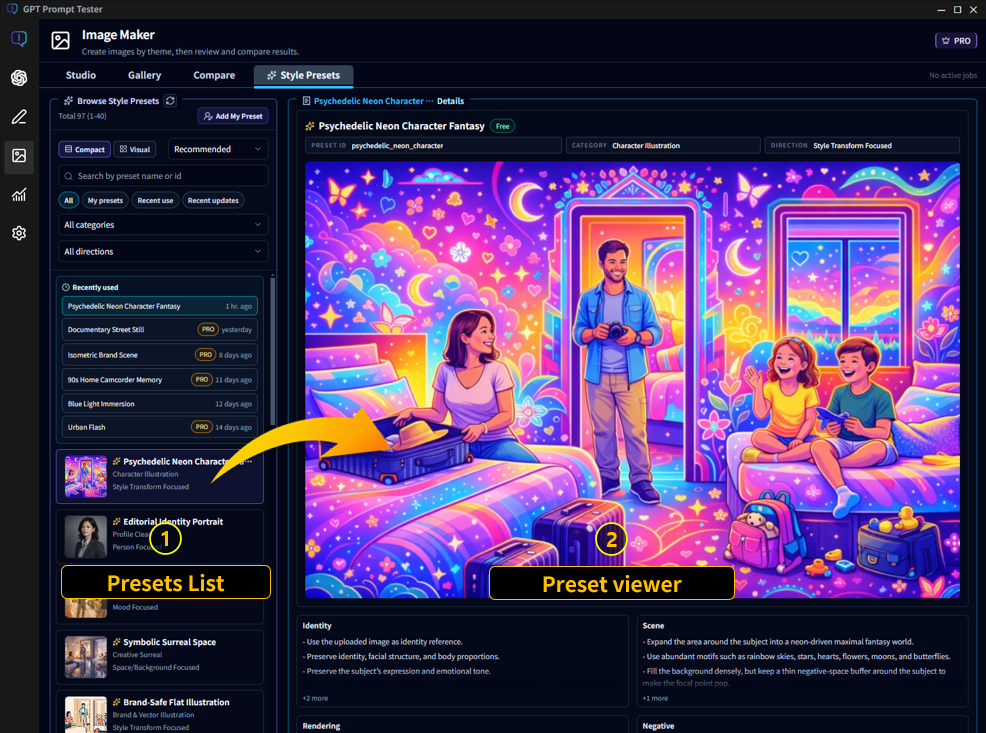
- Preset list (①) : Displays all available style presets. Select a preset to preview its style and configuration.
- Preset viewer (②) : Shows the preview image and the detailed preset structure. This includes identity constraints, scene setup, rendering style, and negative rules used during remix generation.
Search, filter, and browse presets
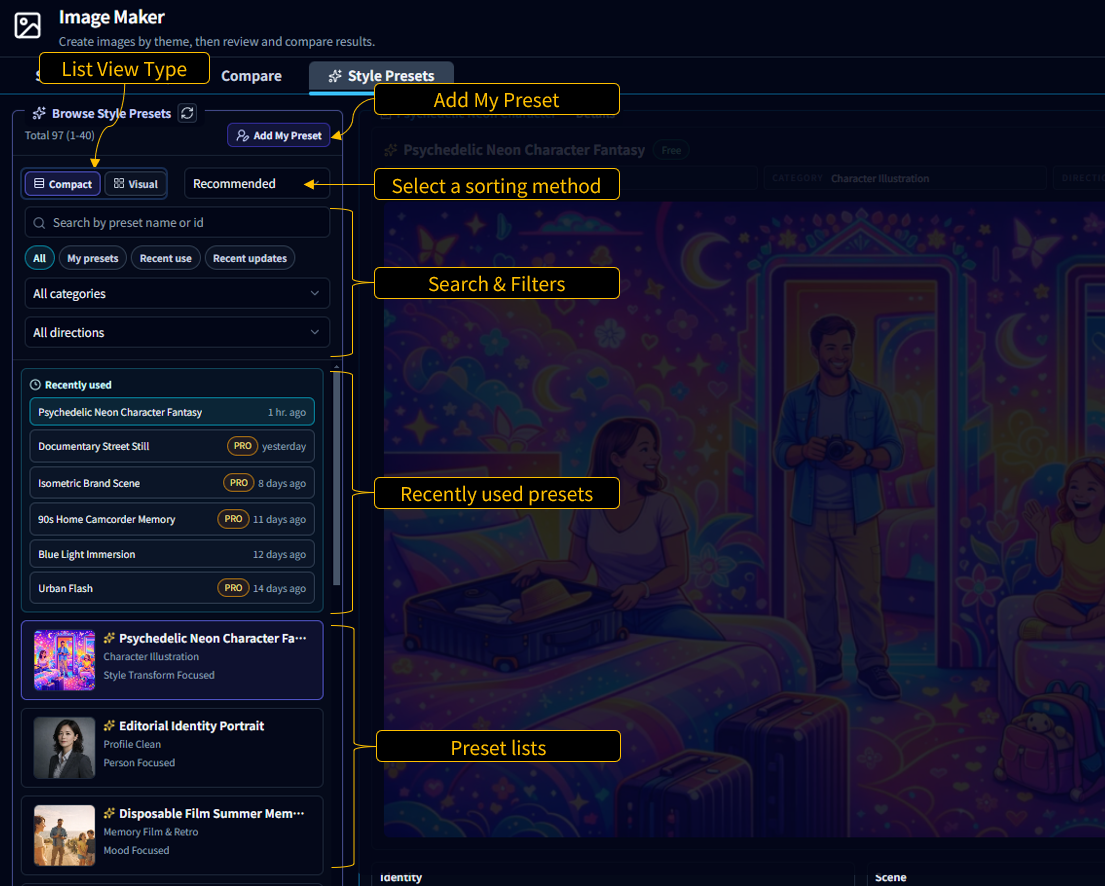
- View type : Switch between compact list view and visual thumbnail view.
- Sorting : Sort presets using options such as recommended order.
- Search : Search presets by preset name or preset ID.
- Filters : Filter presets by category, direction, or preset ownership.
- Recently used : Quickly access presets that were recently used in Image Remix jobs.
Pro presets
Some presets are marked with a PRO label.
- Free users : Can view the preview image (thumbnail) of Pro presets, but cannot access the full preset configuration or use them in generation.
- Pro users : Can view the full preset details and use them directly in Image Remix.
Create your own presets
You can also create and store your own presets inside the app. Custom presets allow you to build a personal library of reusable remix styles.
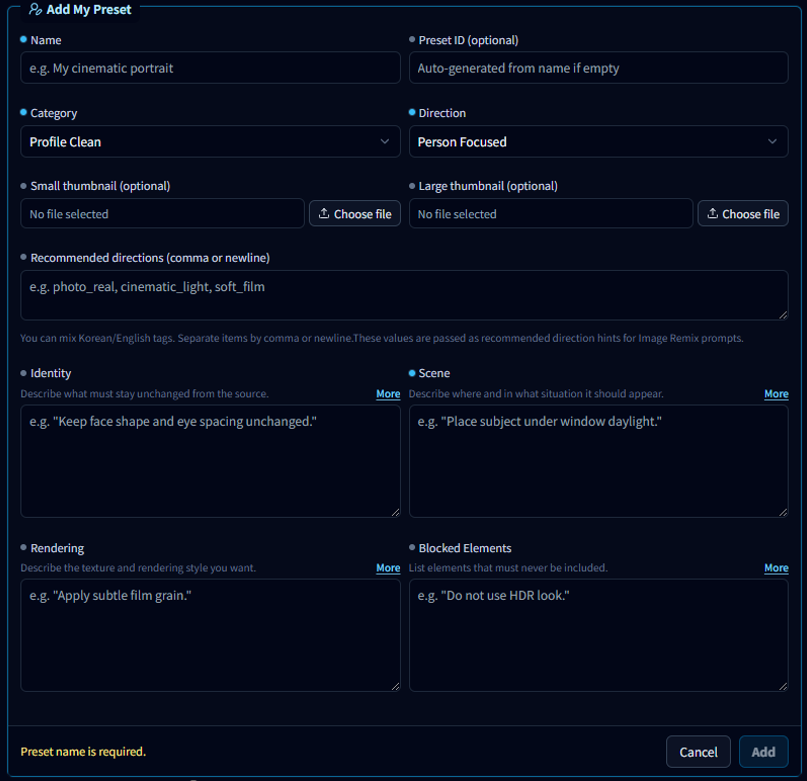
- Add My Preset : Click [Add My Preset] to create a new preset.
- Preset information : Define the preset name, category, and direction.
- Thumbnail images : Optionally upload preview thumbnails for the preset.
- Preset structure : Configure the style behavior using structured sections such as identity, scene, rendering, and blocked elements.
- Local asset storage : Custom presets are saved locally on your device, allowing you to build a personal preset library.
TIP) Building your own preset library can significantly speed up repeated remix workflows and help maintain consistent visual styles.
Theme Input Guide
Image Maker provides multiple generation themes designed for different types of image workflows. Each theme requires slightly different inputs before an image can be generated.
The [Generate] button becomes active only after all required fields are filled. Required fields are marked with the Required label in the interface.
Image Remix
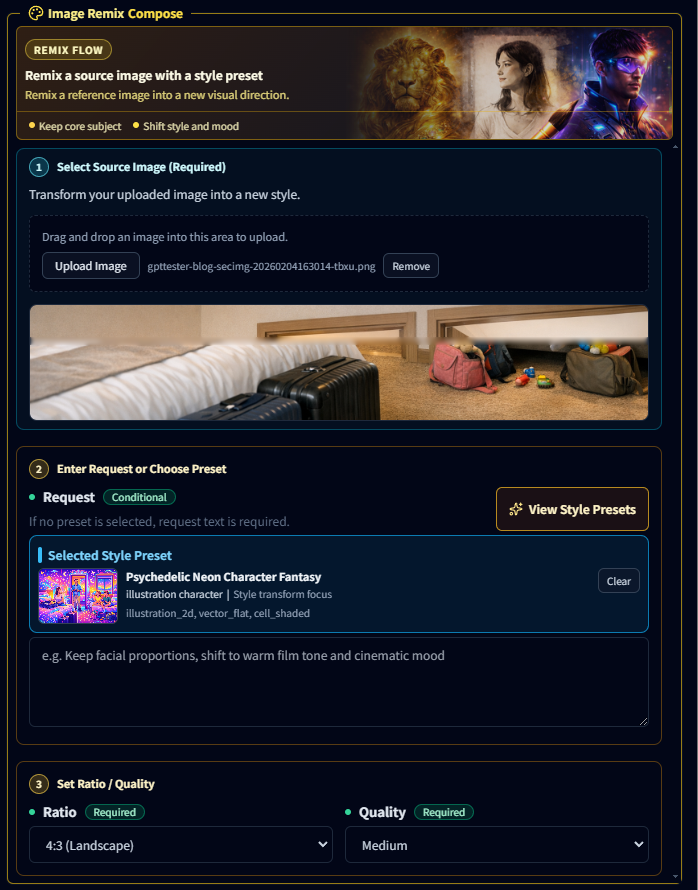
- Purpose : Create a new styled version of an existing image using style presets.
-
Required inputs :
- Source image
- Preset or request description
- Ratio
- Quality
-
When to use :
- Restyling an existing image
- Applying a preset style
- Creating variations of the same composition
Custom Image
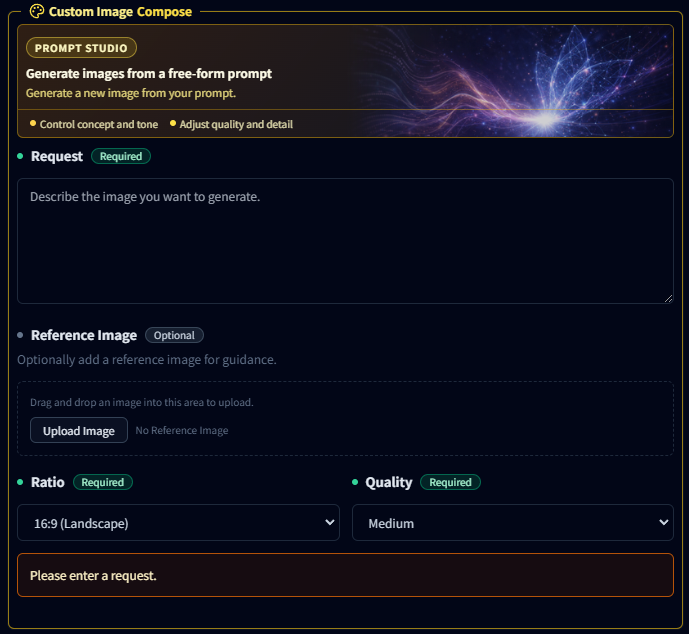
- Purpose : Create a completely new image from a text prompt.
-
Required inputs :
- Request prompt
- Ratio
- Quality
-
Optional inputs :
- Reference image
-
When to use :
- Generating new visuals from ideas
- Concept art or illustrations
- General prompt-based image creation
Section Image
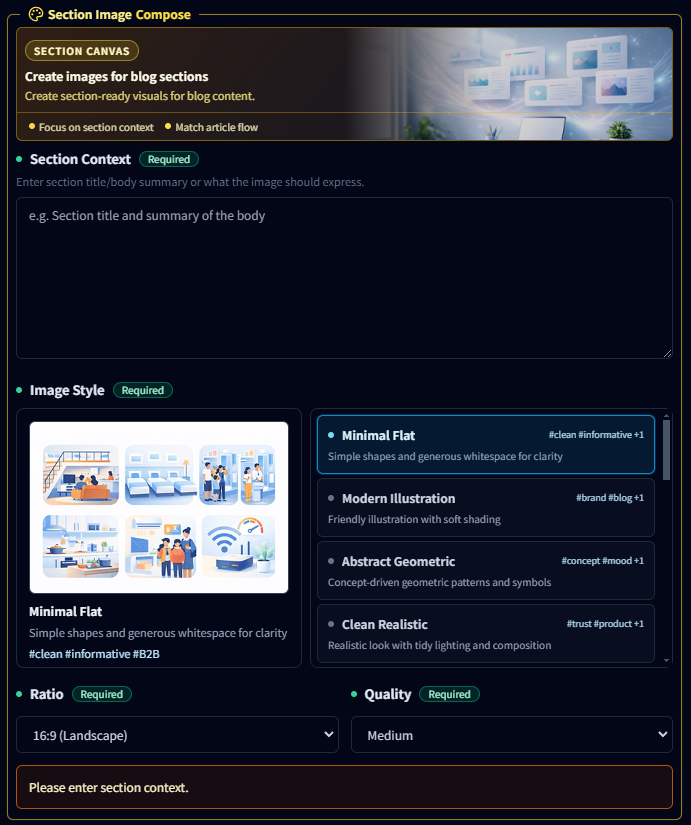
- Purpose : Create structured visuals for blog sections or article headings.
-
Required inputs :
- Section context
- Image style
- Ratio
- Quality
-
When to use :
- Blog post section illustrations
- Article visual support
- Content-friendly informational graphics
Abstract Background
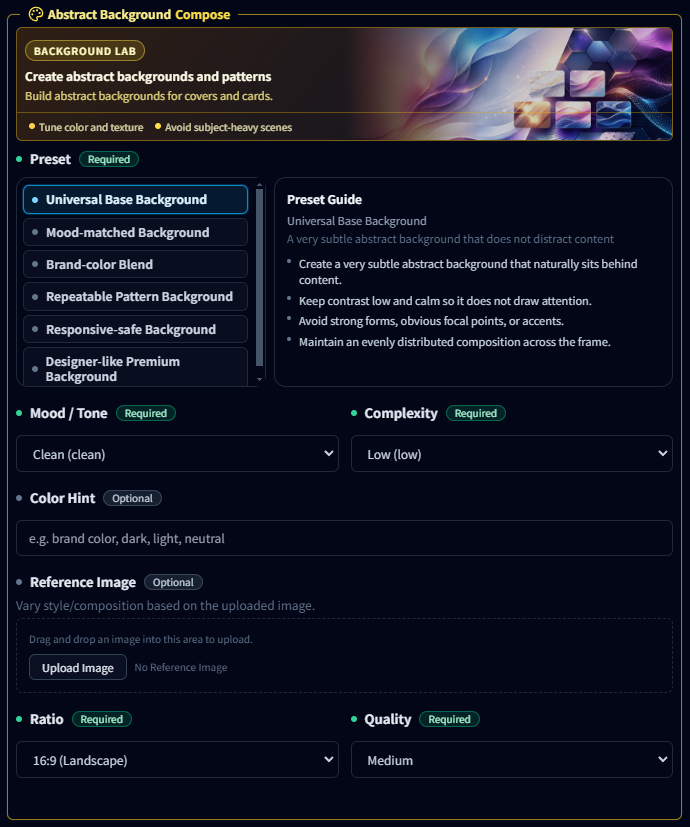
- Purpose : Create abstract backgrounds suitable for covers, cards, or UI elements.
-
Required inputs :
- Preset
- Mood / Tone
- Complexity
- Ratio
- Quality
-
Optional inputs :
- Color hint
- Reference image
-
When to use :
- Website backgrounds
- Presentation visuals
- Graphic design elements
TIP) Choose the theme that best matches your goal. Using the right theme reduces prompt complexity and produces more consistent results.
Free vs Pro
The free trial follows the same rules as Pro. Differences mainly appear in concurrent jobs, storage limits, and management features.
📢 Locked results or limited history in Free become fully available when you switch to Pro (including trial).
FAQ (Errors & Limits)
- Q. I see “You’ve reached the job limit (20/500).”
A. Delete older results in the Gallery and try again. - Q. Nothing starts even after I click Generate.
A. Check your OpenAI API key, save path, and job limits first. - Q. I get a “Safety policy blocked” message.
A. Your request was rejected by safety policy. Try softening the wording or removing sensitive elements. - Q. I’m on Free, and older results are locked.
A. Free users have only the most recent 20 results active. Switching to Pro (including trial) unlocks them. - Q. WordPress upload is disabled.
A. You need WordPress connection info (siteUrl/username/appPassword). Locked results on Free cannot be uploaded.