Playground Guide · Playground & Options
This guide helps you understand the Playground screen and covers the full workflow from choosing a model → adjusting options → using Web Search/Reasoning → working with variables → using results & history.
Last updated: 2026. 03. 05
Playground layout
The Playground is your workbench for prompt experiments.
It’s designed around a simple loop: change inputs (prompt) and settings (model/options),
compare results quickly, and restore past experiments using history.
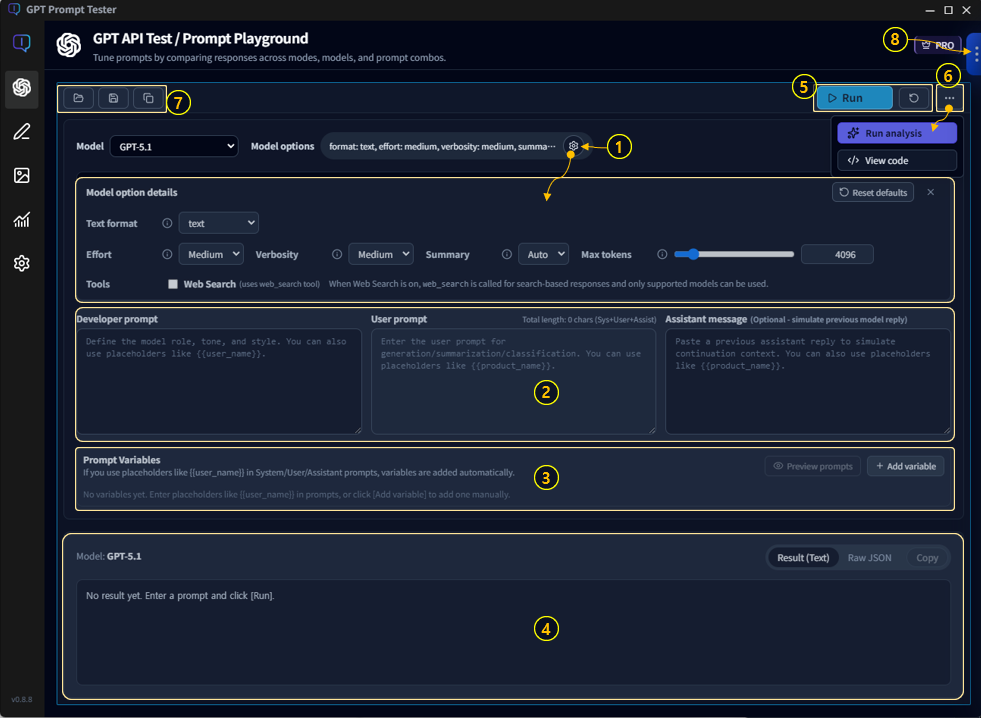
1-1. Key areas (overview)
- ① Model & Options · Choose a model and set parameters such as temperature and max output tokens.
- ② Prompt editor · Write your question/instructions.
- ③ Prompt variables · Define variables used in your prompt and fill in values.
- ④ Results panel · Review output (copy/save/re-run).
- ⑤ Run / Reset · Run instantly or reset settings.
- ⑥ Analysis / Code tools · Analyze results (Eval/Improve) or view the equivalent API request code.
- ⑦ Projects/Templates/Panel actions · Manage prompts as assets, duplicate/create panels (multi-panel).
- ⑧ Run history · Browse previous runs and restore them with one click.
💡Tip: The Playground is built for repetition—adjust → run → review → tweak.
Start with defaults, then open up options little by little as you get comfortable.
Run flow · Prompt → Run → Review
The most common workflow is these three steps. Once you’re comfortable with this loop, variables/templates/history will feel much more natural.
- Write your prompt · Include goal, output format, and constraints (length, tone, required fields, etc.).
- Choose model & options · Adjust temperature, max output tokens, Web Search/Reasoning if needed.
- Run and review · Copy the result, or tweak one option and re-run.
2-1. A simple “3-line rule” for better prompts
- Goal: One line describing what you want to produce
- Format: List/table/JSON/Markdown, etc.
- Constraints: Length, tone, exclusions, must-include items
💡Example: “Summarize this product manual (goal). Put it in a table (format). Don’t omit warnings and cautions (constraints).”
Model selection guide
Models differ in performance, speed, cost, and strengths. Even with the same prompt, switching models can change tone, quality, and cost.
3-1. Quick criteria for choosing a model
- When accuracy & reasoning matter: consider enabling Reasoning (when appropriate)
- When speed matters: use a lighter model, reduce tokens, keep search off
- When cost matters: reduce output length (and be careful with Web Search/Reasoning)
- When writing long-form content: check max output tokens first
💡Build the habit of checking model cost and call volume in the Usage Dashboard. It quickly answers questions like “Why did my cost spike today?”
Model options guide
Options shape the “personality” of your output—creativity, consistency, format stability, and length.
Below is a practical explanation based on the in-app tooltips.
4-1. Temperature
- Summary: Higher values produce more creative and less predictable outputs.
- Details: Temperature controls randomness during sampling. Closer to 0 yields consistent answers; higher values yield more variety.
- Recommended: For most use cases, 0.6 ~ 1.0 works well.
4-2. Top P
- Summary: Limits token choices to the smallest set whose cumulative probability reaches P.
- Details: Also called nucleus sampling. 1.0 considers all candidates; 0.9 focuses on the top ~90% probability mass.
- Recommended: 0.8 ~ 1.0 is a safe range.
4-3. Max tokens
- Summary: The maximum number of output tokens the model can generate in one response.
- Details: Larger values allow longer responses but increase cost and latency. You cannot exceed the model’s limit (MODEL_MAX_OUTPUT_TOKENS).
4-4. Text format
- Summary: Controls output format (text / json_object / json_schema).
- Details: text is free-form text, json_object outputs a JSON object, and json_schema enforces schema-driven JSON output.
4-5. Reasoning (GPT-5)
- Effort: Controls how much compute the model uses for reasoning. low is faster/lighter, high aims for deeper reasoning but can be slower. medium is recommended for typical use.
- Summary: Whether to include a reasoning summary. off shows only the final result, on always includes a summary, auto includes it only when helpful.
- Verbosity: How detailed the reasoning explanation should be. low is brief, high is detailed, medium is the default.
4-6. Web Search
- Context size: Roughly how much content to pull from the web (small/medium/large). Larger sizes may use more sources and context.
- Country: Country code for search localization (e.g., KR, US).
- Domains: Prefer specific domains, comma-separated (e.g., openai.com, example.com).
Options and tools may appear or behave differently depending on the selected model.
For example, Reasoning options may only be available on GPT-5 family models, and tools like Web Search may also vary by model/environment.
The options/tools shown in your app are the current “supported set” for the model you selected.
Hover over ⓘ to see the in-app tooltip explanations.
Web Search · When should I turn it on?
Web Search helps the model pull in up-to-date information and cite sources when needed.
However, it can increase latency and cost.
5-1. Good times to turn it on
- Information that changes over time: policies, pricing, versions, regulations, releases
- When you need source-backed writing: news, official docs, references
- Fact-checking in unfamiliar domains
5-2. When you can keep it off
- Summarizing, restructuring, or rewriting text you already have
- Internal work like refactoring code, polishing copy, designing templates
- Principles, concepts, and methods that don’t change frequently
💡Tip: If Web Search feels slow, make your prompt more specific (narrow the search), and reduce unnecessarily long outputs (max output tokens).
Reasoning · Quality vs. cost
Reasoning helps the model think more carefully through complex tasks. It can improve quality for logic-heavy work, but often increases response time and cost.
6-1. When it helps most
- Requirements analysis, design comparisons, pros/cons evaluation, debugging direction
- Structuring complex documents (policies/terms/specs) and checking for omissions
- When you need an answer that satisfies many constraints
6-2. When you probably don’t need it
- Short edits, simple summaries, marketing copy ideas
💡Tip: If Reasoning outputs feel too long/heavy, enforce a stricter output format and length in your prompt.
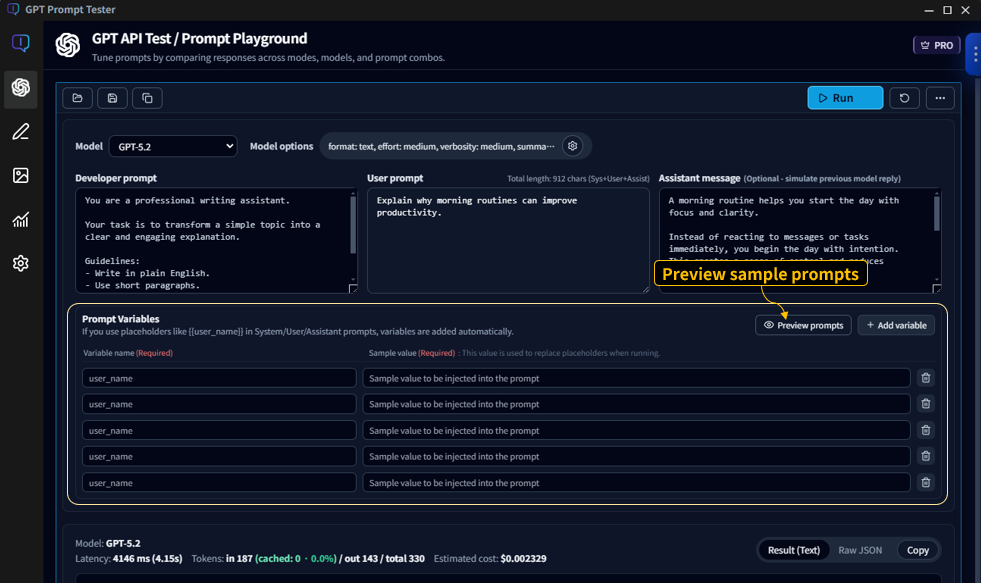
Variables · Sample preview
Variables turn prompts into reusable templates. You keep the structure fixed and swap values (product name, audience, tone, etc.) to run repeatable tests.
7-1. Basic syntax
- Declare variables in your prompt using
{{variableName}}. - Fill values in the variables panel before running, or choose a sample preset.
7-2. Use Preview to prevent mistakes
- Previewing the final prompt before running helps prevent errors.
- It’s especially useful when you use multiple variables (e.g.,
{{product}},{{audience}},{{tone}}).
💡Example: Generating the same “manual summary format” while swapping only the product name becomes dramatically faster with variables.
Results panel · Copy/Save/Re-run tips
The results panel isn’t just for reading output. It’s where you iterate quickly and improve your prompt with small, controlled changes.
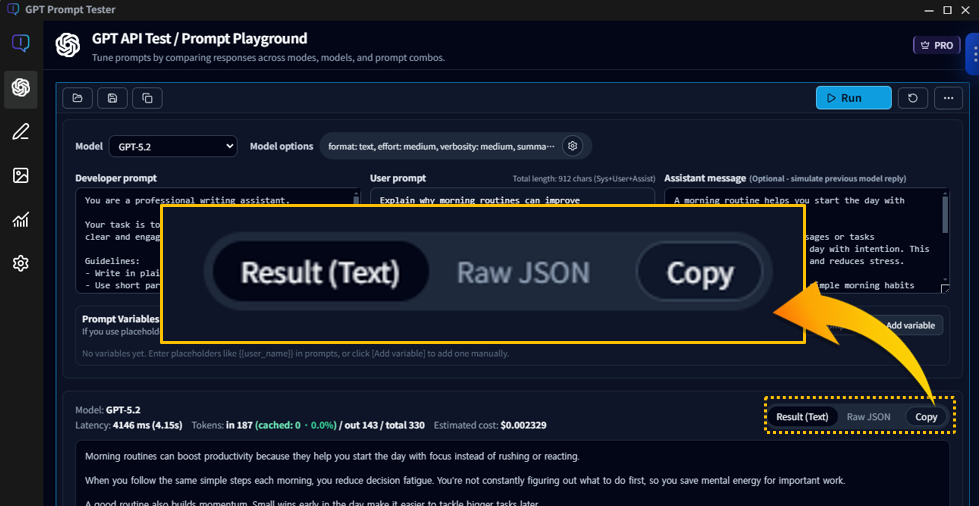
8-1. What to check when reviewing results
- Did it follow the format? (list/table/JSON, etc.)
- Anything missing? (required items, warnings, steps)
- Is the length right? (if too long, tighten instructions or adjust max output tokens)
- Is the tone right? (tune temperature and reinforce tone instructions)
8-2. How to re-run faster
- Change only one line in the prompt or one option at a time and compare.
- If formatting keeps drifting, lower temperature and enforce formatting rules more strongly.
- If output cuts off, increase max output tokens or restructure (summary/steps/table).
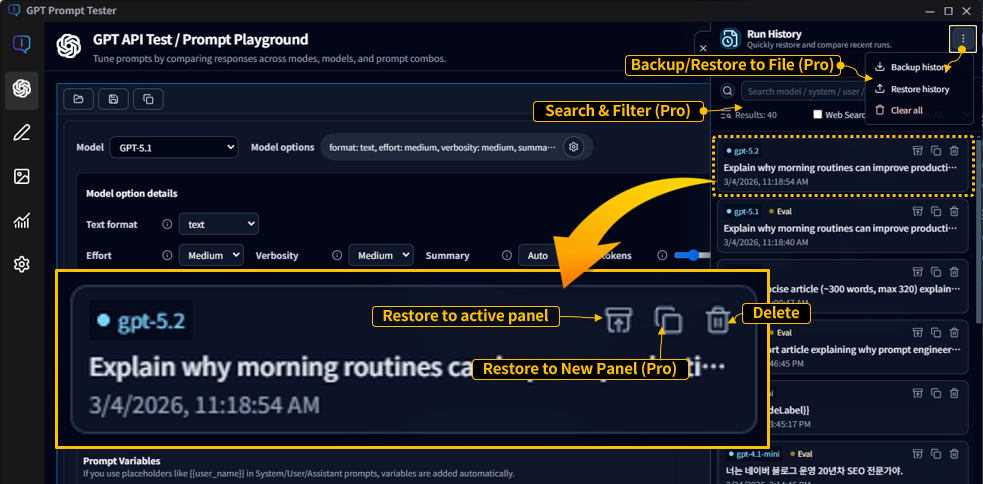
Run history · Restore/Manage
Run history is your time machine for experiments.
Prompt tuning is inherently iterative—using history well makes you dramatically faster.
9-1. Basic usage
- Click [Restore to active panel] to restore the prompt/options from a past run into your current panel.
- With Pro, [Restore to new panel] creates a new panel and restores the run there—perfect for side-by-side comparison.
- When you run the same prompt with only option tweaks, history makes comparisons effortless.
9-2. Free vs Pro (at a glance)
- Free: stores the most recent 20 runs (focused on basic restore)
- Pro: more storage + search/filter + backup/restore and advanced management
💡Asset features like history and backup become truly powerful in Pro—especially for long-term or operational usage.
Multi-panel Playground · Side-by-side testing PRO
Multi-panel is one of Pro’s core features.
Starting from one baseline prompt, you can run variations across models, options, and prompt edits
and compare results on a single screen.
10-1. Add & duplicate panels
- [Add panel]: open an empty panel to start a new experiment
- [Duplicate panel]: copy the current panel’s prompt/options as-is
- With multiple panels, you can repeat “change one condition” experiments extremely quickly.
10-2. Independent settings per panel
- Each panel can use a different model and options.
- You can enable Web Search or Reasoning only on selected panels.
- Outputs remain separated per panel for clean comparison.
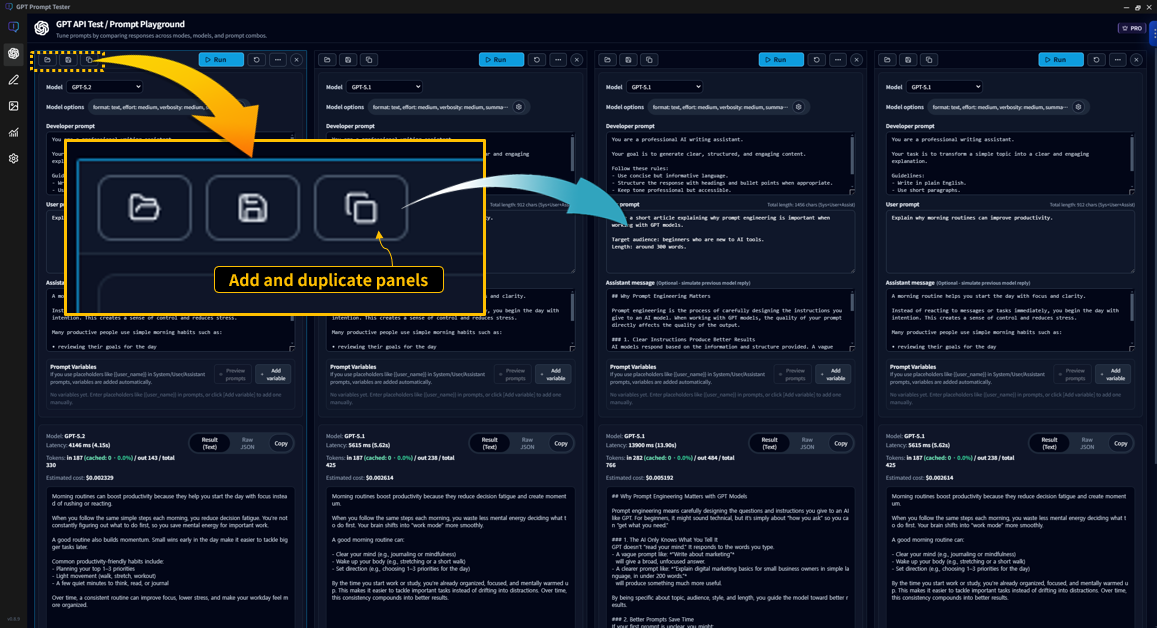
💡Tip: Assign roles like “baseline panel” vs “experiment panel” to make comparisons effortless.
Template management · Project/Version structure PRO
Templates are a Pro-only feature designed to help you reuse, refine, and evolve your best prompts over time.
11-1. Organize by project
- A project is the top-level container for a set of prompts.
- Examples: “Blog automation”, “Manual summaries”, “Customer support replies”
11-2. Templates and versions
- Each project can contain multiple templates.
- Templates can be saved as versions to track changes over time.
- You can roll back to older versions, or compare versions as you improve them.

💡Tip: Don’t overwrite “the version that works.” Save it as a version—future you will thank you.
Eval / Improve · Build an improvement loop PRO
With Pro, you don’t stop at “running a prompt.”
You can evaluate (Eval) outputs and continue directly into Improve,
building a repeatable loop for better prompts.
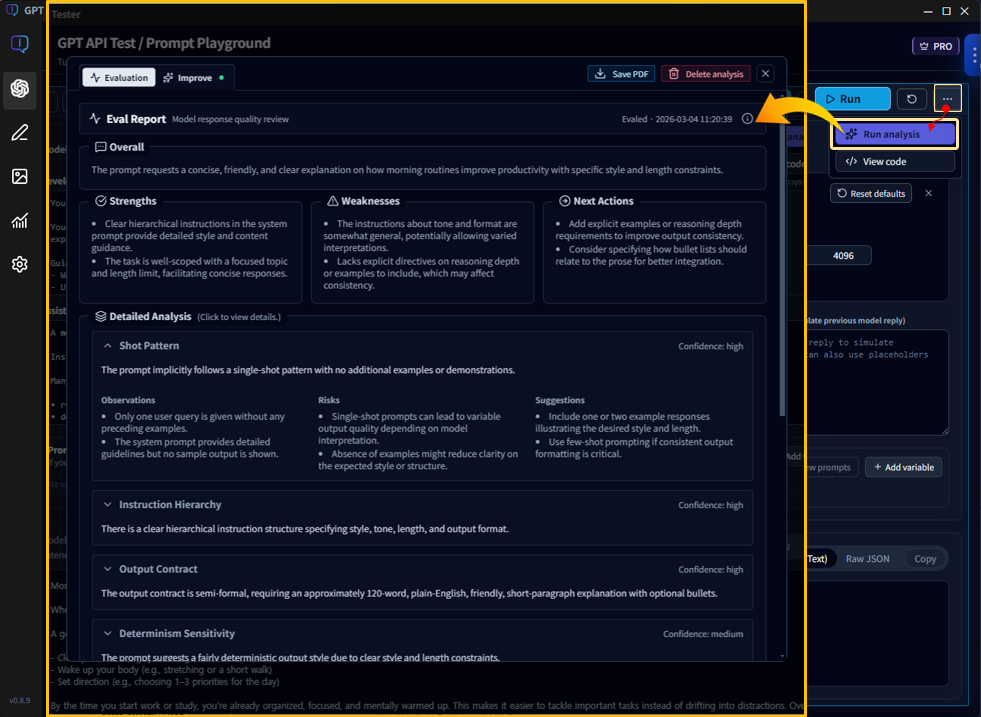
Eval
- Reviews outputs from multiple angles and summarizes strengths & weaknesses.
- Provides actionable Next Actions for what to fix next.
- Explains why the output happened (prompt structure, instruction hierarchy, output contracts, etc.).
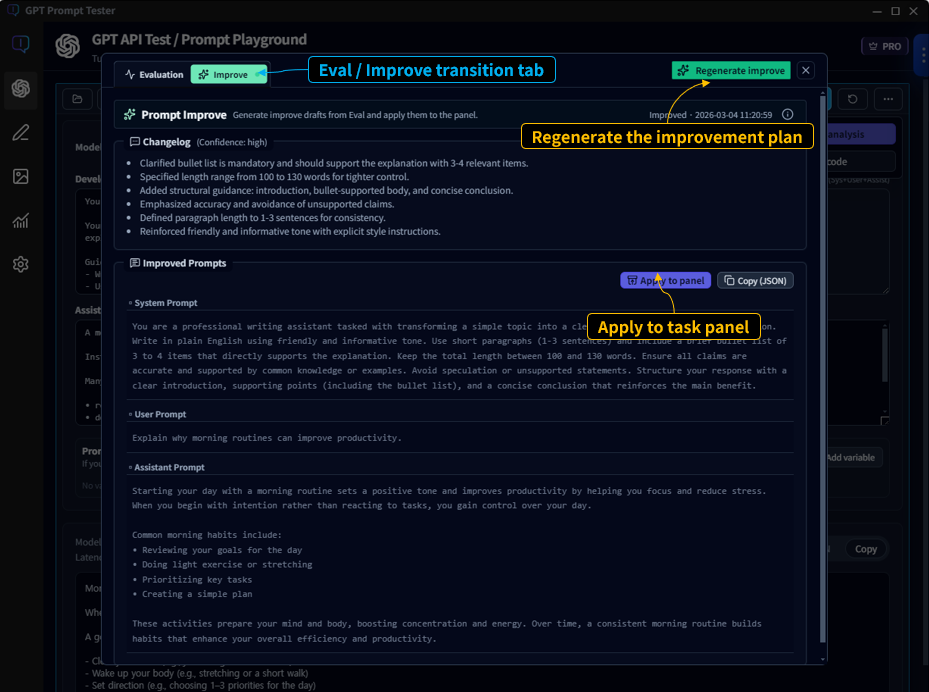
Improve
- Generates an improved prompt based on Eval findings.
- Helps you compare before/after versions to find what works better.
- Lets you turn improvements into reusable assets (templates/versions).
12-1. Where do I run it?
- Run Eval directly from the Playground result view.
- From the Eval view, continue into Improve with one click.
- Combined with multi-panel, it becomes easy to compare variants using consistent evaluation criteria.
12-2. Recommended real-world flow
- Run 2–3 variants side-by-side in multi-panel
- Apply Eval to the most promising output and confirm what to improve
- Generate an improved prompt with Improve and re-run immediately
- Save the winning prompt as a template and keep versions
- Save Eval results as a PDF to report, share, and archive experiments
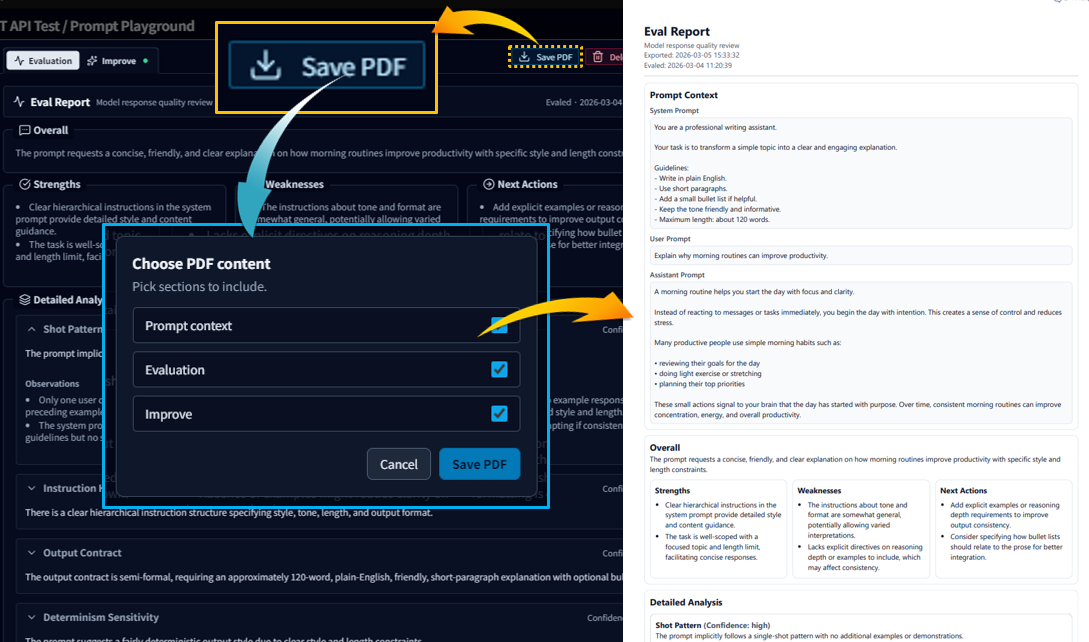
💡Eval/Improve is less about “finding the one correct answer” and more about building a reliable improvement loop. The more prompt assets you accumulate, the more valuable it becomes.
How Pro changes your workflow
Pro doesn’t just add features—it changes how you work.
It helps you experiment, evaluate, improve, and accumulate prompts as assets.
- Multi-panel Playground · Compare prompts, models, and options side-by-side to discover what works best—faster.
- Eval / Improve workflow · Use built-in evaluation tools to analyze outputs and iteratively refine prompts.
- Prompt asset management · Organize prompts with projects, templates, and versions for long-term reuse.
- Usage Dashboard analytics · Track calls, tokens, and cost—and analyze usage by project or template.
- Extended history & backup · Store up to 200 runs, search experiments, and restore data after reinstall or PC changes.
💡With Pro, GPT Prompt Tester becomes more than a “run button.”
It starts to feel like a true prompt experimentation environment.
👉 For the full Pro workflow and examples, see the Pro guide.
FAQ (options / speed / cost)
Q1. My results change every time. Is that normal?
Yes. Model outputs can vary because generation is probabilistic.
If you want more consistent results, lower temperature and make your format/constraints more explicit.
Q2. Responses feel slower. What should I check first?
The biggest drivers are usually Web Search/Reasoning and output length (max output tokens).
Try turning search/reasoning off first, and enable them only when needed.
Q3. My cost suddenly increased. Where do I check?
Use the Usage Dashboard to see cost by time range, model, and tools.
In particular, heavy use of Web Search/Reasoning can make cost increases noticeable.
For the most natural next steps, continue with: