Full Writing Studio demo (Topic → Title → Style → Draft → Publish)
Section 2
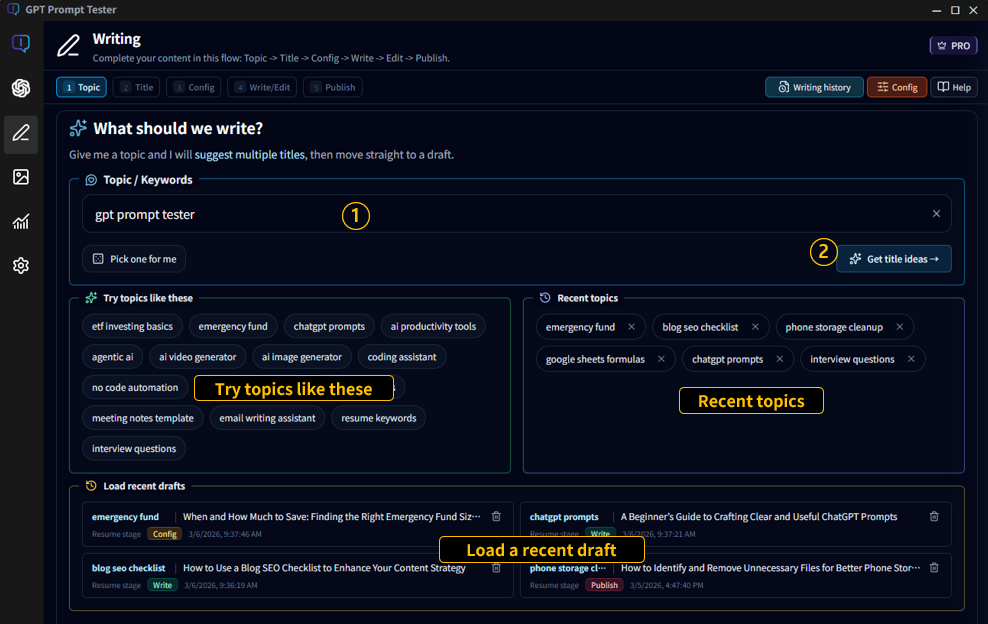
Step 1 · Choose a topic
This is where you begin. Write a single sentence about what you want to write,
or start with a few keywords.
Enter a topic/keywords(①) : It doesn’t have to be perfect. Even one line is
enough—later steps will expand it.
Use suggestions if you’re stuck : If you can’t think of a topic, pick one from “You can
start like this”.
Auto-save while you work : Your progress is saved in Draft History, so just start and
refine later.
Once you enter a topic/keyword, the [Get title ideas] button(②) becomes active. Click it to get suggested
titles.
You can start like this : Click a sample topic/keyword to auto-fill the
“Topic/Keywords” field.
Recent topics : Shows your recently used topics. Click to auto-fill the
“Topic/Keywords” field.
Load a recent draft : Instantly load a recent draft (including settings) and continue
editing.
📢 If you already requested suggestions for the same keyword before, the [Get title ideas](②) button
changes to [View suggested titles].
Section 3
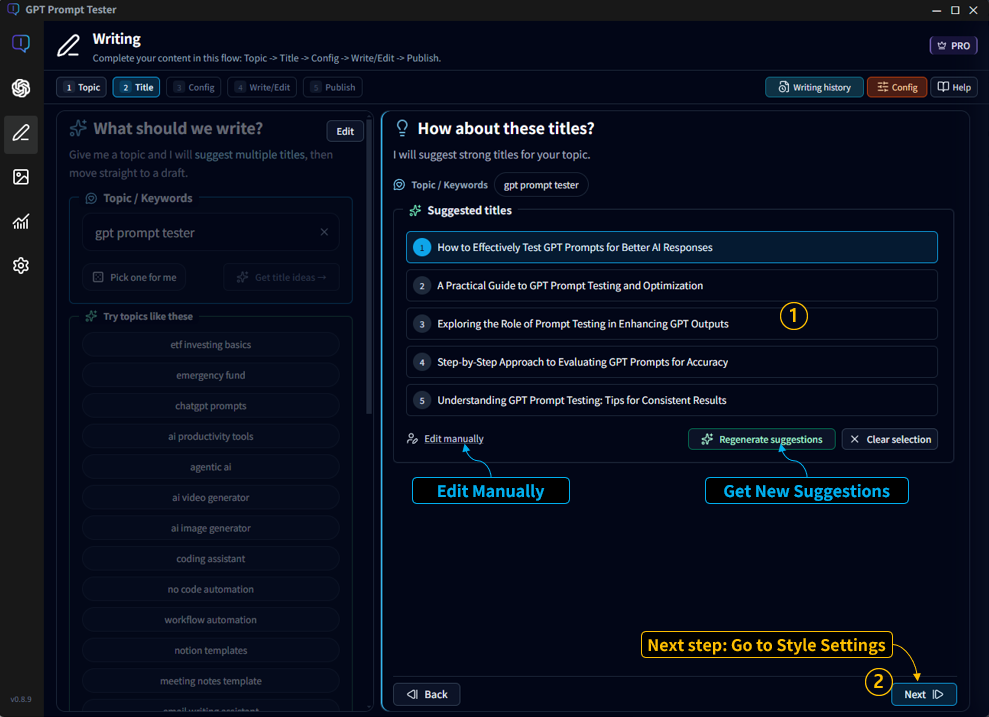
Step 2 · Get title suggestions from GPT
After you enter a topic, GPT suggests multiple title options.
Pick one you like, or regenerate and combine ideas.
GPT proposes multiple title candidates, and you can also edit after selecting one.
Select a Title Candidate(①) : Click one option from the recommended list. The following
steps (outline/draft) will proceed based on the selected title.
Get New Suggestions : If the tone or direction doesn’t match what you want, click the
[Regenerate suggestions] button to receive another set of recommendations.
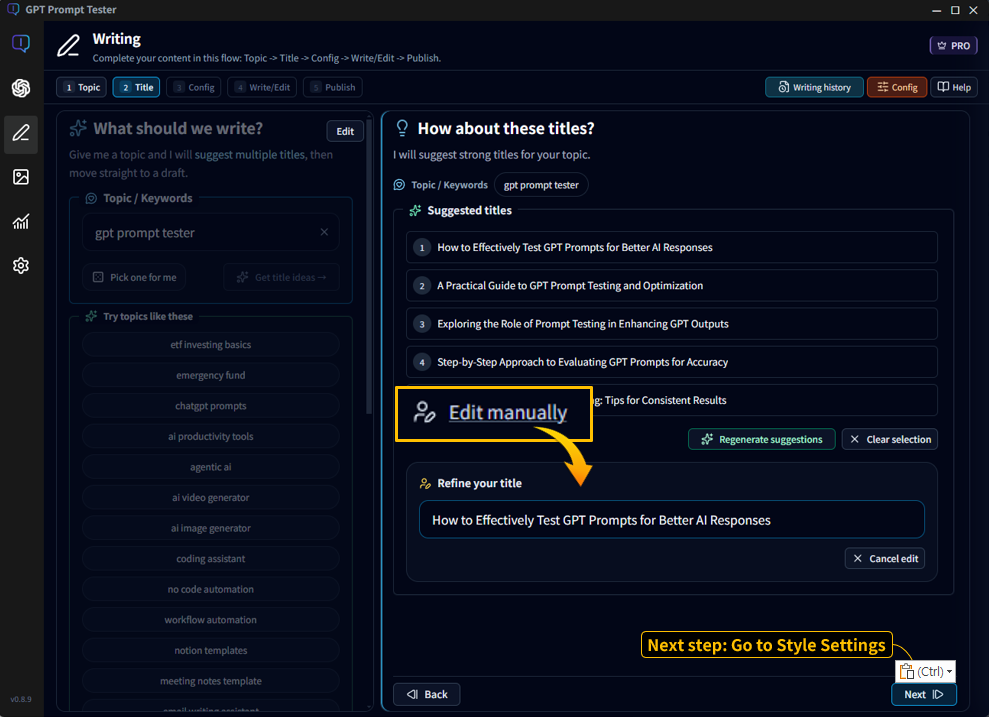
Edit Manually : After selecting a recommended title, click [Edit Manually] to refine or
adjust the title directly.
After selecting a suggested title, click [Edit Manually] to refine or adjust the title directly.
TIP) If your topic is “too broad,” the suggested titles may feel generic. Add 1–2 keywords and quality
usually improves a lot.
Section 4
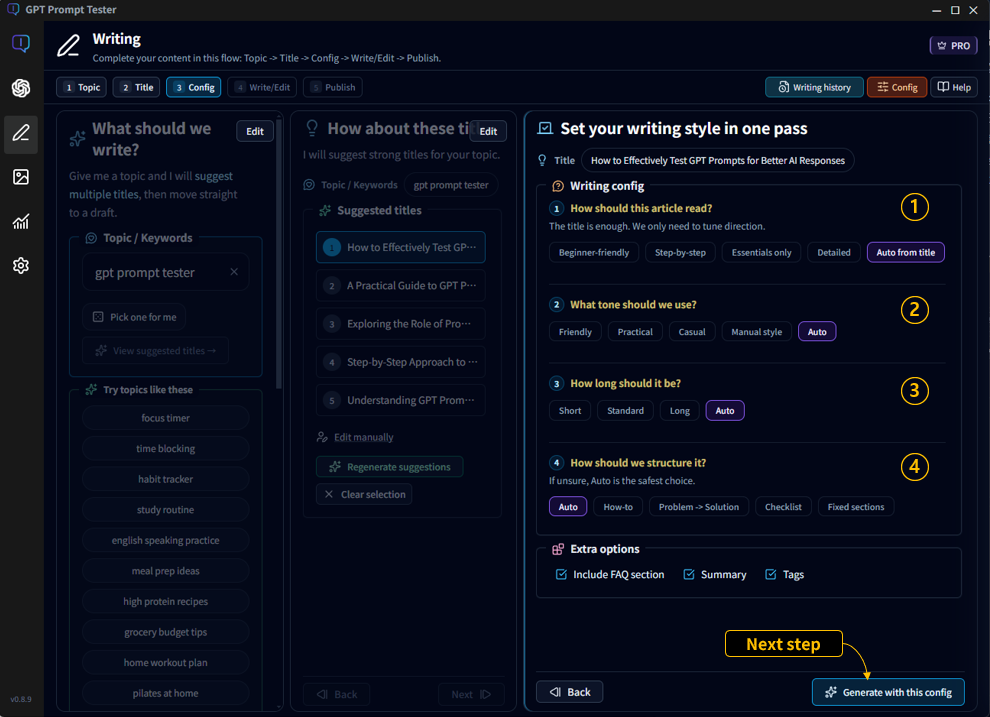
Step 3 · Set your writing style (audience, tone, length, structure)
This step defines how your post will “sound” and how it will be organized.
The same topic can produce very different drafts depending on these choices.
Adjust audience, tone, length, and structure to shape the draft before generating.
① Reading style : Pick the overall approach—beginner-friendly, step-by-step,
essentials-only, or detailed. You can also let it decide automatically from the title.
② Tone : Choose how it should feel—friendly, practical, casual, or “manual-style.”
(Auto is available, too.)
③ Length : Set the target length—short, standard, or long (or Auto).
④ Structure : Decide the format—How-to, Problem → Solution, Checklist, or Fixed
sections (set the number of sections).
Extra options : Toggle whether to include an FAQ section, plus auto-generated summary
and tags.
When you’re ready, click [Generate with this config] to create the first draft.
TIP) If you’re unsure about the settings, just leave them on Auto.
GPT will choose the style and generate a draft automatically.
You can always refine it later in the editor.
Section 5
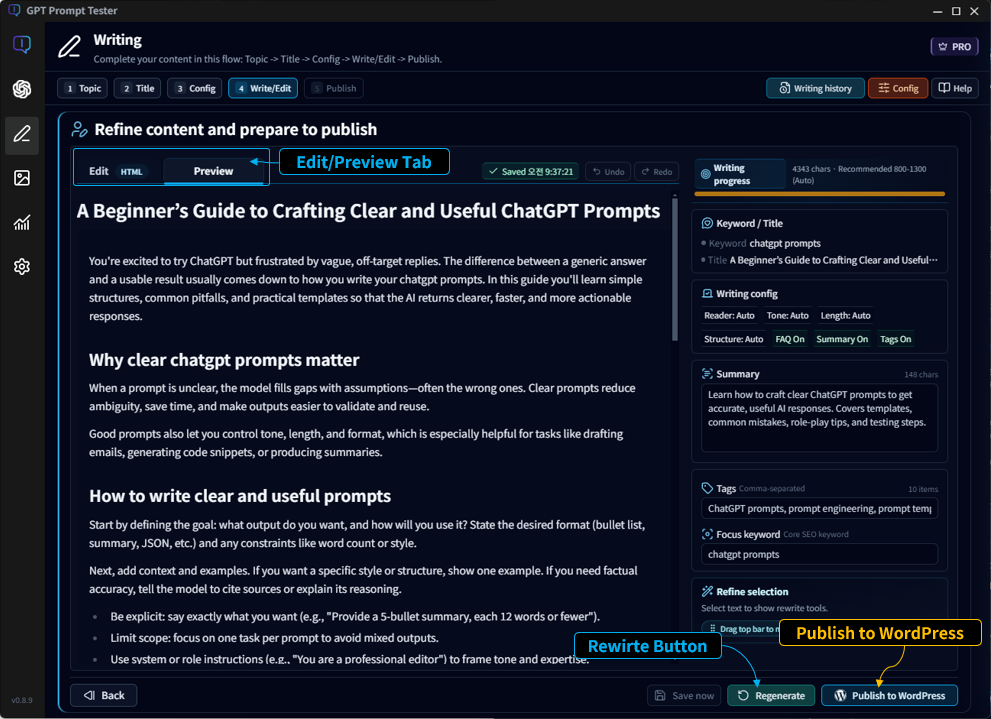
Step 4 · Generate a draft with GPT, then edit
Once your settings are ready, GPT generates a draft.
You can immediately refine it in the editor/preview screen.
This screen shows GPT generating the draft in real time.
Generating… : You can watch the content fill in live while the draft is being
generated.
GPT generates the draft in real time, then switches to edit mode when finished.
Edit / Preview : As soon as generation completes, you can edit the post directly.
Rewrite : If the direction is far off, it’s often faster to change style settings and
regenerate.
TIP) Instead of trying to perfect everything at once, polish a few key paragraphs first to establish
flow—editing time drops a lot.
Rewrite selection
PRO
Select text to open the “Rewrite selection” panel, compare improvements, and apply the one you want.
Pro feature: Select specific paragraphs, run Rewrite, compare results, and apply.
📢 The “Rewrite selection” feature is available to PRO license users only.
Section 6
Step 5 · Publish to WordPress
When editing is done, use the [Publish to WordPress] button to open the WordPress publishing screen,
fill in the required meta info, and publish right away.
Smart publish check :
The system automatically checks recommended publishing items and warns you if something is missing.
Set categories, tags, and the summary, then publish directly to WordPress.
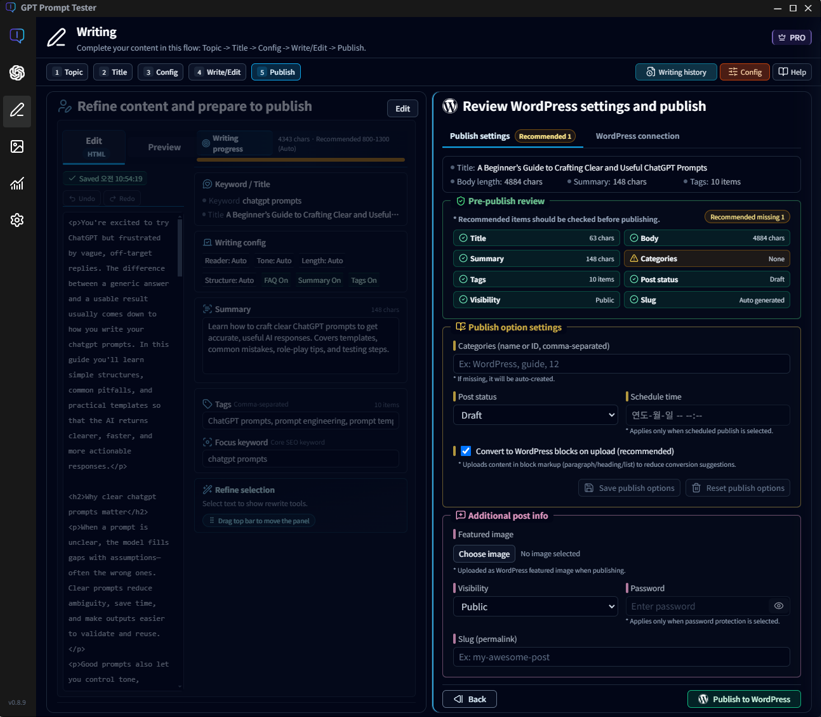
Pre-publish review :
Quickly check whether the required post information is ready before publishing.
You can see the title, body length, summary, tags, categories, visibility, and slug status at a glance.
Missing or incomplete items are highlighted so you can fix them before publishing.
Publish option settings :
Configure how the post will be uploaded to WordPress.
You can enter categories (comma-separated), choose the post status (draft, publish, or scheduled),
and optionally set a schedule time. You can also enable conversion to WordPress block format when
uploading.
Additional post info :
Set optional post details such as a featured image, visibility (public/private/password),
and a custom slug (permalink).
Publish to WordPress :
When everything looks correct, click [Publish to WordPress].
The generated content will be uploaded directly to your connected WordPress site.
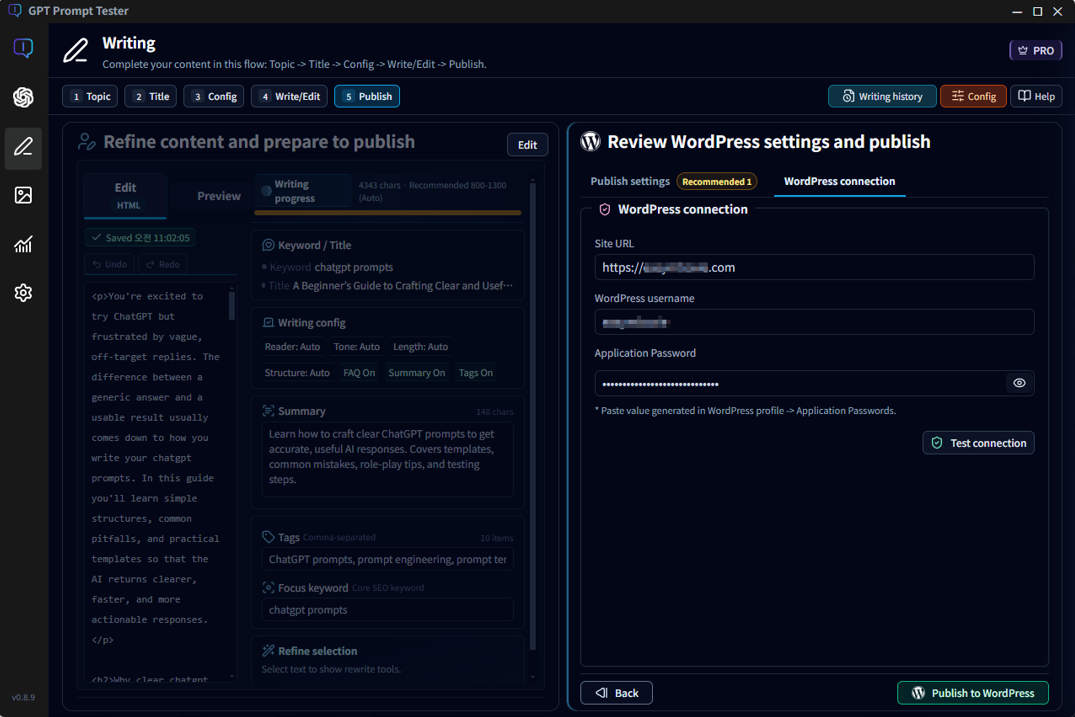
WordPress publishing works best when you register your site/account info in Settings first.
You can also configure WordPress connection details in this step.
WordPress connection : Select the [WordPress Connection] tab to enter or edit
connection details.
📢 The [Publish to WordPress] button is enabled only after WordPress connection info is set.
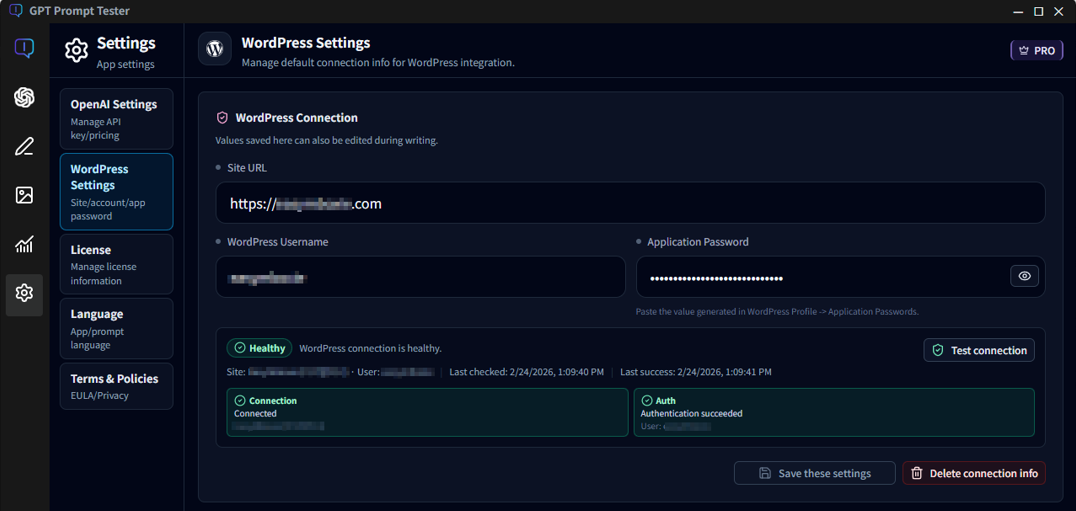
You can also manage WordPress connection details via [Settings] → [WordPress Settings].
📢 You can manage WordPress connection details from the side menu: [Settings] → [WordPress Settings] as
well.
Section 7
Draft history
Generated drafts are automatically saved so you can revisit them later.
You can reopen previous drafts, continue editing, or reuse them as a starting point
to create a new version with a different style.
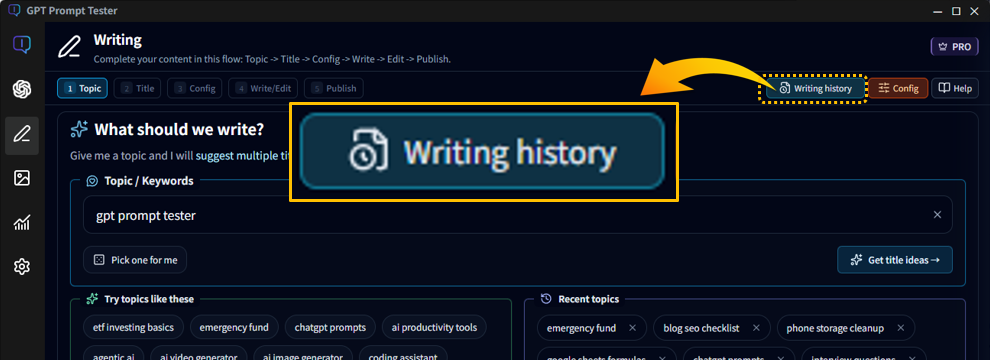
Open the Writing history button to view previously generated drafts.
Writing history :
Click the [Writing history] button at the top-right of the writing screen
to open the list of previously generated drafts.
Load a previously generated draft and optionally restore the original GPT settings used to create it.
Auto-save :
Your writing progress is automatically saved while you work.
Each draft is stored in Writing history so you can return to it later.
Load draft :
Click the Load icon next to a history item to reopen that draft
and continue editing or rewriting it.
Restore original settings :
When loading a draft, you can choose to apply the snapshot settings
(the GPT configuration used when the draft was originally generated).
Manage writing history
PRO
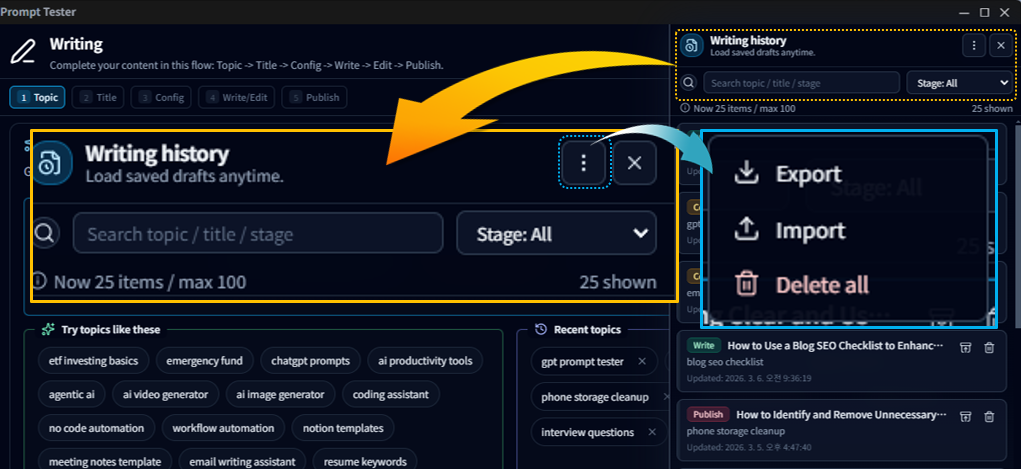
Pro users can search, filter, export, and restore writing history.
Extended history :
Pro users can store up to 100 writing drafts in history,
while the Free version stores up to 10 drafts.
Search and filter :
When many drafts are saved, use the search box to find drafts by
topic, title, or stage, and filter them by writing stage.
Export (backup) :
You can export your writing history as a JSON file.
This allows you to keep a local backup of your drafts.
Import (restore) :
Previously exported JSON files can be imported to restore
writing history on the same or another device.
Delete all :
You can clear all saved drafts from the history at once.
TIP) Exporting your history periodically is a good way to keep a backup
of important drafts before clearing or reinstalling the app.
Section 8
Prompt / Model settings & history
You can control how Writing Studio generates titles and drafts.
This panel allows you to select the AI model, adjust request options,
override prompts, and reuse previous configurations through history.
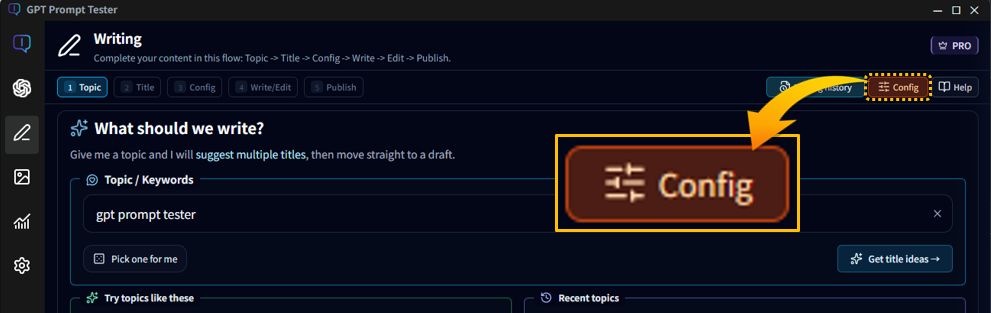
Open the settings panel by clicking [Config] at the top-right of the Writing screen.
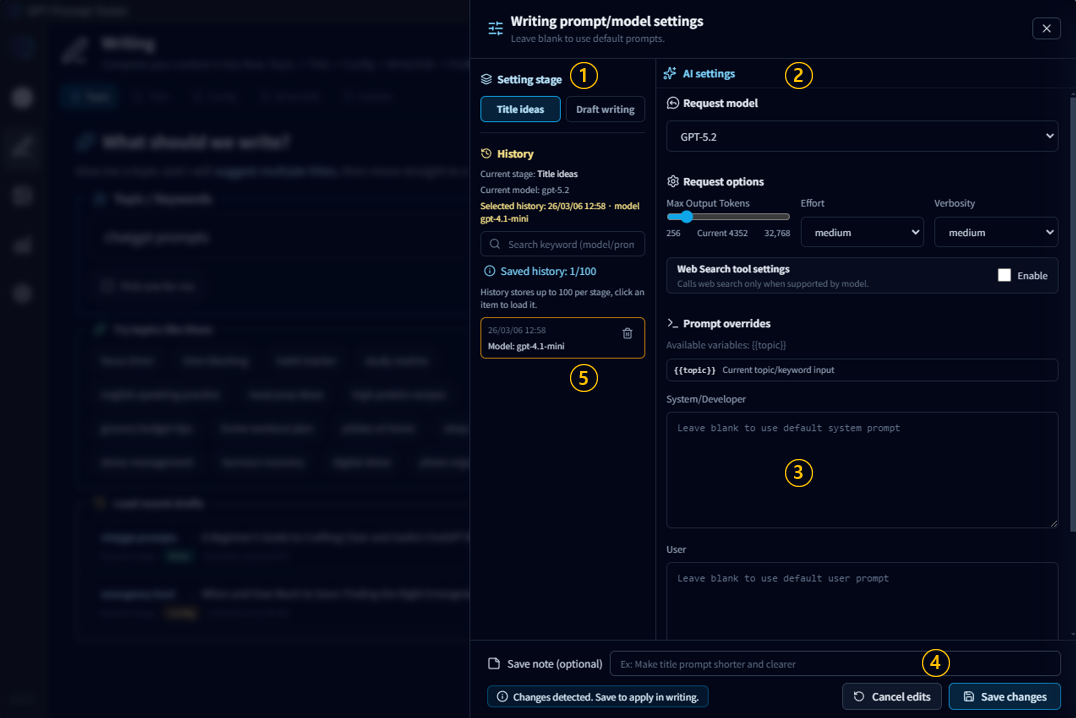
Configure model options, prompts, and reuse previous configurations from history.
① Setting stage :
Choose which step you want to configure.
You can set different configurations for
Title ideas (title generation) and
Draft writing (article generation).
② AI settings :
Select the request model and adjust generation options
such as output tokens, reasoning effort, verbosity,
and optional web-search support (depending on model capability).
③ Prompt overrides :
Advanced users can override the default prompts by editing
the System/Developer or User prompts directly.
If left empty, the built-in prompts are used.
④ Save note :
When you change settings, you can add a short note
before saving. This helps you remember what the configuration was used for.
⑤ Settings history :
Previous configurations are stored in history.
You can reload them to reuse earlier model/prompt setups.
TIP) If the result isn’t what you expected,
changing the model or adjusting the request options
is usually the most effective way to influence the output.
PRO
History limits depend on your plan.
Free users can keep only 1 configuration,
while Pro users can store up to 100 settings per stage
and search through their configuration history.
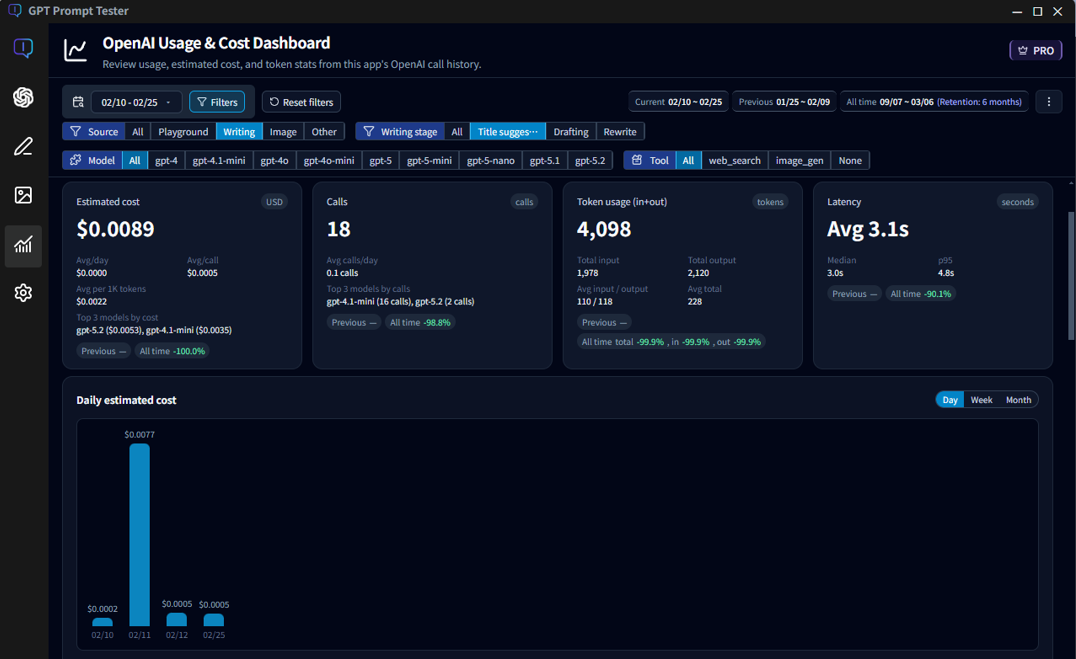
Section 9
Review API usage and cost
Writing Studio uses the OpenAI API to generate titles and drafts.
You can analyze how those API calls are used in the Usage & Cost Dashboard.
This dashboard shows call counts, token usage, estimated cost, and response latency
for the prompts generated by the app.
Analyze API usage, token consumption, cost trends, and model performance.
Usage overview :
Quickly check estimated cost, number of API calls,
token usage (input/output), and response latency.
Source filtering :
Filter usage by feature such as
Playground, Writing, or Image Maker
to see where API usage is coming from.
Writing stage analysis :
For Writing Studio, you can filter calls by stage
(e.g., Title suggestions, Draft generation, or Rewrite)
to understand which step consumes the most tokens or cost.
Model comparison :
Compare how different models affect cost, speed,
and token usage for the same type of task.
Trend charts :
View daily, weekly, or monthly cost trends
to understand how your API usage grows over time.
TIP) If generation cost feels higher than expected,
try switching to a smaller model or adjusting request options
in the Config settings.
Some Writing Studio capabilities differ between the Free and Pro versions
(including the Pro trial), mainly around storage limits,
history management, and advanced editing tools.
Feature
Free
Pro (includes trial)
Draft storage
Up to 10 drafts
Up to 100 drafts
Draft retention
Older drafts are automatically removed when the limit is exceeded
All drafts remain available until manually deleted
History management
Basic history list only
Search, filter, export, import, and delete-all
Prompt settings history
Only the most recent configuration is kept
Up to 100 saved per writing stage
Search settings history
Not available
Search by model, prompt, or memo
Rewrite selected text
Not available (Pro notice shown)
Available
📢 Pro features become available immediately after license activation
(including during the trial period).